
Tools
- rustup: command-line tool to manage rust version
- rustc: Rust compiler. Generates a binary file
- cargo: Rust build system. Used to manage a project and its dependencies
Create new project using Cargo
To create a new project with cargo, the following command:
$ cargo new <project_name>
Which creates a directory containing :
cargo.toml: Contains the package information (name, version, authors, compiler version, etc..) and the project dependenciessrc/which contains the.rssources
Build and run the project
To build a project, this command is used:
$ cargo build
Which creates an executable in target/debug/<project_name>. The executable can be launched either with:
$ ./target/debug/<project_name>
or with
$ cargo run
which builds (if necessary) and run the project.
To make sure that a program correctly compiles but not actually compile it, the command $ cargo check can be used. This is useful to check the code without actually compiling it.
Managing dependencies
Cargo is very useful to build a project using dependencies. To add a dependency to a project, its name and version must be added in the Cargo.toml file:
[dependencies]
rand = "0.7.3"
This adds the random library to the project, which provides methods to generate random numbers. The Crates.io is where people in Rust ecosystem post their open source projects. The version number of the dependency means “every version that has a public API compatible with version 0.7.3”
An advantage of Cargo is that it ensures reproducible build with the Cargo.lock file, which means that it ensures we are able to rebuild a project even if a new version of a dependency is no more compatible with our code.
If we want to update the versions of a project dependencies, the $ cargo update command can be used. By default, this will only update between 0.7.3 and 0.8.0 (in our rand example). To update to the 0.8.x, the Cargo.toml file has to be modified.
Building the documentation
Rust has documentation comments that use three slashes /// instead of two and support Markdown notation for formatting the text:
/// Adds one to the number given.
///
/// # Examples
///
/// ```
/// let arg = 5;
/// let answer = my_crate::add_one(arg);
///
/// assert_eq!(6, answer);
/// ```
pub fn add_one(x: i32) -> i32 {
    x + 1
}
To build the html documentation, the $ cargo doc --open command builds our doc (as well as the one for all of the dependencies) and opens it.
As # Example section used above, here are some other sections commonly used in documentations:
- Panics: Scenarios in which the function could panic
- Errors: If the function returns a
Result, describing the kinds of errors that might occurs - Safety: If the function is
unsafeto call, explaining why the function is unsafe
Project Organization
Rust has a number of features that allow you to manage code’s organization:
- Packages: A Cargo feature that lets you build, test, and share crates
- Must contain 0 or 1 library crate
- Can contain as many binary crates as needed
- Must contain at least one crate (library or binary)
- Contains a Cargo.toml configuration file
- Crates: A tree of modules that produces a library or executable
- Modules and use: Let you control the organization, scope, and privacy of paths
- Paths: A way of naming an item, such as a struct, function, or module
Variables
/* Immutable variable */
let x = 0;					// immutable variable
x = 10; 					// NOT POSSIBLE! (x is immutable)

/* Mutale variable */
let mut y = 0;				// mutable variable
y = 10;						// ok

/* Const variable */
const CONST_VAL: u32 = 10;	// const var must specify the type (uint32 here) and value

/* Shadowing variable */
let number: String = "10";
let number: u32 = number.trim().parse().expect("not a number");	// new 'number' variable shadows the old one (can or not have a new type). Useful to avoid having intermediate var (e.g. numberStr)
Base Data Types
Rust is statically typed language, which means that it must know the types of all variables at compile time.
/* integer types */
let x: u8 = 10; 		// 8-bit unsigned int
let x: i64 = -1395;		// 64-bit signed int
let x: usize = 0xffe9;	// arch-bit (32 on 32-bit arch)


/* Floating points types */
let x = 3.0;			// float 64-bit
let x: f32 = 3.0;		// float 32-bit

/* Boolean types */
let x: bool = true;

/* Character type  (4-bytes in Rust) */
let c = 'z';
let turkey = '🦃';		// char in Rust can store UTF special characters

/* Tuple type (group of values of different types) */
let tup: (i32, f64, u8) = (400, 6.4, 5);
println!("tuple ({}, {}, {})", tup.0, tup.1, tup.2)	// accessing each elt
let (a, b, c) = tup;			// destructuring the tuple (breaks into 3 parts)
println!("b = {}", b);			// prints 6.4

/* Array (single type, fixed size, on the stack) */
let a = [1, 2, 3, 4, 5];
let a = [3; 5]; 	// [3, 3, 3, 3, 3]
let a: [i32; 5] = [1, 2, 3, 4, 5]; 	// specifying the type and size
println!("1st elt = {}", a[0]);
Functions
fn main() {
    println!("Coucou salut");
    another_function("gros");
    println!(another_one());
}

fn another_function(x: String) {
    println!("Wesh {}", x);
}

fn another_one() -> String {
    "Ca joue?"
}

fn plus_one(x: i32) -> i32 {
    x + 1
}
Statement vs Expression
In Rust, expression and statement are an important concept. Statements are instructions that perform some action and do not return a value. Expressions evaluate to a resulting value.
fn main() {
    let y = 6;
}
In this snippet, let y = 6 is a statement. It doesn’t returns any value, therefore (for example), you can’t assign a let statement to another variable. The following code isn’t possible:
let x = (let y = 6);
error: expected expression, found statement (‘let’)
Expressions must evaluate to something. The 5 + 6 math operation is an expression that evaluates to 11. An expression can also be part of a statement, like in the first example where 6 is an expression (in let y = 6;). Calling a function or a macro is also an expression. The block used to create scope {} is also an expression:
let y = {
    let x = 3;
    x + 1
}
In this case, the expression in the {} evaluates to 4, so y = 4;. Note that the x + 1 line doesn’t have ending semicolons.
Control flow
/* If statement */
let condition = true;
let number = if condition {4} else {6};		// if in let statement

if number < 5 {
    println!("number < 5");
} else {
    println!("number >= 5");
}

/* Loops */
// Infinite loop
loop {
    println!("again..");
}

// Return value from loop
let mut counter = 0;
let result = loop {
    counter += 1;

    if counter == 10 {
        break counter * 2;
    }
};

// While loop
let number = 0;
while number != 0 {
    println!("{}", number);
    number -= 1;
}

// For loop through a range (countdown)
for number in (1..4).rev() {	// .rev() reverses the range
    println!("{}", number);
}

// For loop through collection
let a = [10, 20, 30, 40, 50];
for elt in a.iter() {
    println!("value = {}", elt);
}
Ownership
Ownership is Rust’s most unique feature, and it enables Rust to make memory safety guarantees without needing a garbage collector.
Ownership rules
- Each value in Rust has a variable that’s called its owner.
- There can only be one owner at a time.
- When the owner goes out of scope, the value will be dropped.
Example with String type
String is a data type that differs from the string literal as it is mutable and is allocated on the heap, so therefore can have a variable size.
let s = "hello";		// string literal, immutable
let mut s = String::from("hello");	// String, mutable
s.push_str(" world!");	// String can grow
The memory of the String is allocated at runtime (when we call String::from), and is automatically returned once the variable that owns it goes out of scope (Rust automatically calls drop).
Move
In Rust, moving a String to another is done as a Shallow copy (only the String struct is copied, not the data).
// assigning integer value of variable
let x = 5;
let y = x; // y takes the value of x. Same as y = 5
// assigning String
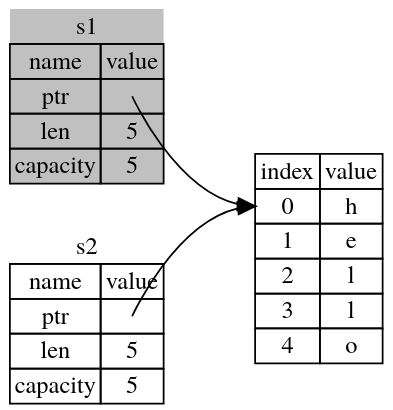
let s1 = String::from("hello");
let s2 = s1; // s1 is invalidated
When doing let s2 = s1, the variable s1 is invalidated:
Clone
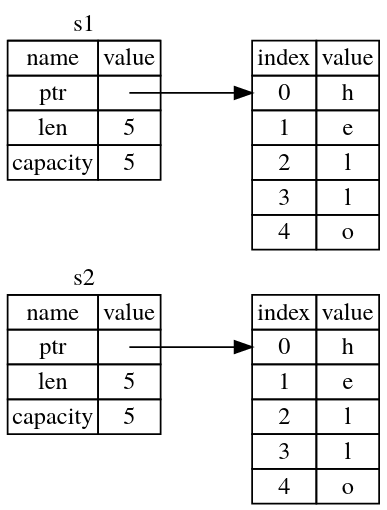
If we want to copy the String struct and its heap data (deep copy), the clone method can be used:
let s1 = String::from("hello");
let s2 = s1.clone();
Ownership and Functions
When a String is passed to a function, it is moved, so the variable is invalidated. Same when a function returns a String, the variable in the function is invalidated.
let s1 = String::from("hello");
let s2 = takes_and_gives_back(s1);	// at this point, s1 is invalidated (moved when passed
									// to the function), and s2 takes s1's properties

fn takes_and_gives_back(a_string: String) -> String {
    a_string	// a_string is returned and moves out to the calling function
}
References and Borrowing
To solve the problem of variable invalidation each time it is passed to a function, the references are used.
let s1 = String::from("hello");
let len = calculate_length(&s1);	// &s1 is a reference pointing to s1

fn calculate_length(s: &String) -> usize {	// s is a reference to a String
    s.len()
}
If we want to change the value of a String in a function, we must use a mutable reference:
let mut s1 = String::from("hello");	// s1 must be mutable
change(&mut s1);	// &mut is a mutable reference

fn change(s: &mut String) {	// s must accept a mutable reference
    s.push_str(" world");
}
But mutable references have one big restriction: you can have only one mutable reference to a particular piece of data in a particular scope. This restriction prevents race condition.
let mut s1 = String::from("hello");
let r1 = &mut s1;
let r2 = &mut s1;		// ERROR!
This also applies to immutable references. It is possible to have multiple immutable references (as none of them will modify the value), but we can’t have immutable and a mutable reference (as the immutable ones won’t expect the value to change).
Note that a reference’s scope starts from where it is introduced and continues through the last time that reference is used. For instance, this code will compile because the last usage of the immutable references occurs before the mutable reference is introduced:
let mut s = String::from("hello");

let r1 = &s; // no problem
let r2 = &s; // no problem
println!("{} and {}", r1, r2);
// r1 and r2 are no longer used after this point

let r3 = &mut s; // no problem
println!("{}", r3);
Slice type
Slices let you reference a contiguous sequence of elements in a collection rather than the whole collection. The slice structure contains a pointer to the start of the segment and its length. The example below takes a String reference as parameter and returns a String slice of the first word.
fn first_word(s: &String) -> &str {		// &str is the "String slice" type
    let bytes = s.as_bytes();

    for (i, &item) in bytes.iter().enumerate() {
        if item == b' ' {
            return &s[0..i];	// first word slice
        }
    }
    &s[..]		// the whole String (same as &s[0..s.len()])
}
The string literals (let s = "Hello";) are String slices of type &str, which is an immutable reference.
Structures
Basic struct
/* Struct definition */
struct User {
    username: String,
    email: String,
    sign_in_count: u64,
    active: bool,
}

/* Struct implementation */
impl User {
    // Custom constructor (static method)
    fn new(username: String, email: String) -> User {
        User {
            username,
            email,
            sign_in_count: 0,
            active: true,
        }
    }

    // Instance method
    fn login(&self, password: &str) -> bool {
        if self.external_login(password) {
            self.sign_in_count += 1;
			return true;
        }
        return false;
    }
}

/* Struct instantiation */
let mut user1 = User {
    email: String::from("someone@example.com"),
    username: String::from("someusername123"),
    active: true,
    sign_in_count: 1,
};

/* Struct field access (The entire struct must be mutable) */
user1.email = String::from("anotheremail@example.com");

/* Using the custom constructor */
let mut user2 = User::new("tati", "tati@example.com");
Tuple struct
Useful when we want to give the whole tuple a name but naming each field would be verbose or redundant.
struct Color(i32, i32, i32);
struct Point(i32, i32, i32);

let black = Color(0, 0, 0);
let origin = Point(0, 0, 0);
Enum & Pattern Matching
Enums
/* Basic enum */
enum RabbitColors {	// a set of possible colors
    White
    Black,
    Brown,
}

/* IP addresses example */
enum IpAddr {
    V4(u8, u8, u8, u8),
    V6(String),
}
let home = IpAddr::V4(127, 0, 0, 1);
let loopback = IpAddr::V6(String::from("::1"));

/* Message example */
enum Message {
    Quit,
    Move { x: i32, y: i32 },
    Write(String),
    ChangeColor(i32, i32, i32),
}

impl Message {
    fn call(&self) {
        // method body would be defined here
    }
}

let m = Message::Write(String::from("hello"));
m.call();
Option Enum
The Option Enum gets rid of the NULL value, but keep the concept of a value being absent. Its implementation is as follow:
enum Option<T> {		// Generic type <T>
    Some(T),
    None,
}
It can either have some of T, or None of it.
Pattern matching
First example:
enum UsState {
    Alabama,
    Alaska,
    // --snip--
}

enum Coin {
    Penny,
    Nickel,
    Dime,
    Quarter(usState),
}

fn value_in_cents(coin: Coin) -> u8 {
    match coin {
        Coin::Penny => 1,
        Coin::Nickel => 5,
        Coin::Dime => 10,
        Coin::Quarter(state) => {
            println!("State quarter from {:?}!", state)
            25
        }
    }
}
Option<T> match
To test if a value is present or absent.
fn plus_one(x: Option<i32>) -> Option<i32> {
    match x {
        None => None,
        Some(i) => Some(i + 1),
    }
}
_ Placeholder
To avoid writing each cases.
let some_u8_value = 0u8;
match some_u8_value {
    1 => println!("one"),
    3 => println!("three"),
    5 => println!("five"),
    7 => println!("seven"),
    _ => (),
}
if let concise control
To handle values that match one pattern while ignoring the rest.
if let Some(3) = some_u8_value {
    println!("three");
}
Common Collections
Vectors
// create a vector
let v: Vec<i32> = Vec::new();
let mut v = vec![1, 2, 3];		// macro to simplify creation

// update a vector
v.push(4);

// access vector element (careful with the mutable refs)
let third: &i32 = &v[2];	// program panics if v[2] doesn't exists
let third: Option<&i32> = v.get(2);	// third = None if v[2] doesn't exists

// iterate through vector
for elt in &v {
    println!("{}", elt);
}
Strings
// create a String
let s = String::new();
let data = "a string";
let s = data.to_string();
let s = "a string".to_string();
let mut s = String::from("a string");

// update a String
s.push(' ');
s.push_str("appended to");
let s2 = String::from("another");
s = s + " " + &s2;

// access String element (Warning, UTF-8 has variable character size in Bytes)
let hello = "Здравствуйте";	// UTF-8 encoded String
let s = &hello[0..4];		// returns string slice "Зд" because each character is 2 Bytes in this case

// iterate through String characters
for c in "नमस्ते".chars() {
    println!("{}", c);		// न म स ् त े
}

for b in "नमस्ते".bytes() {
    println!("{}", b);		// 224 164 --snip-- 165 135
}
Hash Maps
HashMap<K, V> stores a mapping of keys of type K to values of type V. It does this via a hashing function, which determines how it places these keys and values into memory.
Hash maps are useful when you want to look up data not by using an index, as you can with vectors, but by using a key that can be of any type. For example, in a game, you could keep track of each team’s score in a hash map in which each key is a team’s name and the values are each team’s score. Given a team name, you can retrieve its score.
use std::collections::HashMap;		// must be brought into scope manually

// create HashMap
let mut scores = HashMap::new();

// update HashMap
scores.insert(String::from("Blue"), 10);
scores.insert(String::from("Yellow"), 50);

// access HashMap element
let score = scores.get("Blue");		// score = Some(&10)

// iterate through HashMap
for (key, value) in &scores {
    println!("{}: {}", key, value);
}
Errors handling
Rust groups errors into two categories: recoverable and unrecoverable errors.
Recoverable errors with Result
Result enum:
enum Result<T, E> {		// T and E are generic types of the values returned on Ok and Err
    Ok(T),
    Err(E),
}
A match example to open a file and handle errors :
use std::fs::File;
use std::io::ErrorKind;

fn main() {
    let f = File::open("hello.txt");

    let f = match f {
        Ok(file) => file,
        Err(error) => match error.kind() {
            ErrorKind::NotFound => match File::create("hello.txt") {
                Ok(fc) => fc,
                Err(e) => panic!("Problem creating the file: {:?}", e),
            },
            other_error => {
                panic!("Problem opening the file: {:?}", other_error)
            }
        },
    };
}
Shortcuts: unwrap and expect
/* Unwrap calls panic! for us on error */
let f1 = File::open("hello1.txt").unwrap();

/* Expect does the same as unwrap but allows to set an error message */
let f2 = File::open("hello2.txt").expect("Failed to open hello.txt");
The ? operator
The ? operator is syntactic sugar that can be used in functions that return Result or Option, and will automatically return an error if the function called fails.
fn read_username_from_file() -> Result<String, io::Error> {
    let mut f = File::open("username.txt")?;		// if Err, returns it automatically
    let mut s = String::new();

    f.read_to_string(&mut s)?;						// if Err, returns it automatically

    Ok(s)
}
Unrecoverable errors with panic!
Calling panic! macro causes the program to stop and print the message:
panic!("Crash and burn!")
Automated tests
Let’s see how automated tests are used in Rust with a library crate example:
adder
├── Cargo.toml
├── src
│   └── lib.rs
└── tests
    └── integration_test.rs
The src/lib.rs file contains the library functions and also the Unit tests. These are small tests to validate each unit of code in isolation from the rest of code.
/* Library functions */

pub fn add_two(a: i32) -> i32 {
    internal_adder(a, 2)
}

fn internal_adder(a: i32, b: i32) -> i32 {
    a + b
}

/* Functions unit tests */

#[cfg(test)]		// this anotation makes Rust only compile this module while testing
mod tests {
    use super::*;

    #[test]
    fn internal_adder()  {
        assert_eq!(4, internal_adder(2,2));		// we can also test private functions
    }

    #[test]
    fn add_two_and_two() {
        assert_eq!(4, add_two(2));
    }

    #[test]
    fn add_three_and_two() {
        assert_eq!(5, add_two(3));
    }
}
The tests/ directory contains the Integration tests. These tests are entirely external to the library, and use our library in the same way any other code would (meaning they can only call library’s public functions). Their purpose is to test whether parts of the library work together correctly.
As an example, the tests/integration_test.rs:
use adder;

#[test]
fn it_adds_two() {
    assert_eq!(4, adder::add_two(2));
}
To run the tests, these commands can be used:
# run the crate tests
$ cargo test
# run test and show tested code println
$ cargo test -- --show-output
# run a subset of tests
$ cargo test add	# this command only tests 'add_two_and_two()' and 'add_three_and_two'
Note: The example showed here is of a library crate. If we want to test a binary crate, it is a good practice to add a src/lib.rs in addition to the src/main.rs. The lib.rs file will contain all the logic of the crate, and therefore could be tested with integration tests. The main.rs file will only contain small amount of code that uses the lib.rs.
Generic types
Generic types allows to handle duplication of concepts. A function doing the same operation on different types shouldn’t be written twice.
For instance, this function finds the largest number of a list of <T>:
fn largest<T: PartialOrd + Copy>(list: &[T]) -> T {
    let mut largest = list[0];

    for &item in list {
        if item > largest {
            largest = item;
        }
    }
    largest
}

fn main() {
    let number_list = vec![34, 50, 25, 100, 65];
    let result = largest(&number_list);
    let char_list = vec!['y', 'm', 'a', 'q'];
    let result = largest(&char_list);
}
Generic type can also be used in Struct definitions:
struct Point<T> {
    x: T,
    y: T,
}

impl<T> Point<T> {
    fn x(&self) -> &T {
        &self.x		// getter
    }
}

fn main() {
    let integer = Point { x: 5, y: 10 };
    let float = Point { x: 1.0, y: 4.0 };
    let wont_work = Point { x: 1.0, y: 4 };	/* x and y must have the same type <T> ! */
}
Enum also use generic types:
enum Option<T> {
    Some(T),
    None,
}

enum Result<T, E> {
    Ok(T),
    Err(E),
}
Traits: Defining shared behavior
A trait tells the Rust compiler about functionality a particular type has and can share with other types. Traits are similar to interfaces in other languages, although with some differences.
pub trait Summary {
    fn summarize_author(&self) -> String;
    fn summarize(&self) -> String {
        String::from("(Read more...)")		// Default implementation
    }
}

pub struct Tweet {
    pub username: String,
    pub content: String,
    pub reply: bool,
    pub retweet: bool,
}

impl Summary for Tweet {
    fn summarize_author(&self) -> String {
        format!("From f{}", self.username)
    }
}

// Function taking a summarizable item
pub fn notify(item: &impl Summary) {// syntactic sugar for fn notify<T: Summary>(item: &T)
    println!("Breaking news! {}", item.summarize());
}

// Function taking a Sumarizable and Displayable item
pub fn notify(item: &(impl Summary + Display)) { ... }

// Function taking a Displayable/Clonable and a Clonable/Debugable params
fn some_function<T, U>(t: &T, u: &U) -> i32
    where T: Display + Clone,
          U: Clone + Debug
{
Validating References with Lifetimes
// 'a lifetime needed to tell the compiler that x, y and the return must have the same
// lifetime length
fn longest<'a>(x: &'a str, y: &'a str) -> &'a str {
    if x.len() > y.len() {
        x
    } else {
        y
    }
}
// static lifetime live for the entire program's duration. All string literals have a
// static lifetime (stored in program's binary)
let s: &'static str = "I have a static lifetime.";
Functional language features
Closures
Anonymous functions that can be saved in variable or passed as arguments to other functions. They are usually short and only used within a narrow context.
In closures, arguments and return type is inferred by the compiler when called. The types annotations can be added, but are optional.
let expensive_closure = |num| {
    println!("calculating slowly...");
    thread::sleep(Duration::from_secs(2));
    num
};
Closure can be used for memorization (or lazy evaluation) pattern, in which the closure and its results are stored in a struct and the closure is called only if needed :
struct Cacher<T>
where
	T: Fn(u32) -> u32,		// T implements the Fn trait. Takes an u32 and returns an u32
{
    calculation: T,			// the closure
    value: Option<u32>,		// cached result
}

impl<T> Cacher<T>
where
	T: Fn(u32) -> u32,
{
    fn new(calculation: T) -> Cacher<T> {
        Cacher {
            calculation,
            value: None,
        }
    }

    fn value(&mut self, arg: u32) -> u32 {
        match self.value {
            Some(v) => v,
            None => {
                let v = (self.calculation)(arg);
                self.value = Some(v);
                v
            }
        }
    }
}

// Usage:
let mut expensive_result = Cacher::new(|num| {
    println!("calculating slowly...");
    thread::sleep(Duration::from_secs(2));
    num
});
expensive_result.value(10);
expensive_result.value(10);	// the calculation isn't done the second time
Closures can also capture variables from the surrounding environment, for example:
let x = 4;
let equal_to_x = |z| z == x;
assert!(equal_to_x(4));
There are three ways of capturing environment, encoded in the three Fn trait as follows:
FnOnceconsumes the variables it captures.FnMutcan change the environment because it mutably borrows values.Fnborrows values from the environment immutably.
In the example above, equal_to_x borrows x immutably, so has the Fn trait.
Iterators
Iterators allow to perform some task on a sequence of items in turn.
let v1 = vec![1, 2, 3];
for val in v1.iter() {
    println!("Got: {}", val);
}
All iterators implement the Iterator trait, which defines the next() method. This method returns Some(Item), and None when the iteration is over.
To take ownership of the items of v1, we can call into_iter() method. Similarly, if we want to iterate over mutable references, we can call iter_mut().
The Iterator trait also defines some other methods :
-
sum():
let v1 = vec![1, 2, 3]; let total = v1.iter().sum(); // equals 6 -
map(): Takes a closure and calls it on each item
let v1: Vec<i32> = vec![1, 2, 3];
let v2: Vec<i32> = v1.iter().map(|x| x + 1).collect();	// vec![2, 3, 4]
The
collect()method is needed to consume the “mapped” iterator and collect the resulting values into a collection data type. -
filter(): Takes a closure returning a boolean. If the closure returns
true, the item will be included in the iterator produced byfilter(), else not.struct Shoe { size: u32, style: String, } // This method returns a vector of shoes in my size fn shoes_in_my_size(shoes: Vec<Shoe>, shoe_size: u32) -> Vec<Shoe> { shoes.into_iter().filter(|s| s.size == shoe_size).collect() } -
zip(): ‘Zips up’ two iterators into a single iterator of pairs.
let a1 = [1, 2, 3]; let a2 = [4, 5, 6]; let mut iter = a1.iter().zip(a2.iter()); iter.next(); // Some((&1, &4)) -
For others, see https://doc.rust-lang.org/std/iter/trait.Iterator.html#provided-methods
Smart Pointers
In Rust, references (with the &) are the kind of pointers mostly used. They don’t have other capabilities than referring to data, and don’t have any overhead.
Smart Pointers on the other hand, are data structures that act like a pointer but also have additional metadata and capabilities
Smart pointers are usually implemented using structs that implements the Deref and Drop traits. Deref allows an instance of the smart pointer struct to behave like a reference, so you can write code that works with either references or smart pointers. Drop allows to customize the code runned when an instance of the smart pointer goes out of scope.
Box<T> to point to Data on the Heap
Box<T> allows to store data on the heap rather than on the stack. Box are often used in those situations:
- variable with unknown size at compile time
- large amount of data to transfer ownership but unsure the data won’t be copied
- reference a variable that must implement a trait but the type doesn’t import
let b = Box::new(5);
Cons List
Boxes allow to enable recursive types. Recursive types are types whose size can’t be known at compile time. In this case, a value can have as part of itself another value of the same type (hence the recursive type).
Cons List is a data structure using this recursive type, in which each item contains two elements: the value of the current item and the next item (as in a chained list). The last item in the list contains only a value called Nil without a next item.
Although functional programming languages use cons list frequently, it isn’t a commonly used data structure in Rust. Most of the time, Vec<T> is a better choice to use.
Here is an implementation of a cons list of i32 using Box<T>:
enum List {
    Cons(i32, Box<List>),
    Nil,
}

use crate::List::{Cons, Nil};

fn main() {
    let list = Cons(1, Box::new(Cons(2, Box::new(Cons(3, Box::new(Nil))))));
}
Concurrency
Another Rust’s major goal is to handle concurrent programming safely and efficiently (concurrent programming is when different parts of a program execute independently and parallel programming when different parts of a program execute at the same time).
Threads
use std::thread;
use std::time::Duration;

fn main() {
    // Spawns a new thread
    let handle1 = thread::spawn(|| {
       for i in 1..10 {
           println!("hi number {} from the spawned thread!", i);
           thread::sleep(Duration::from_millis(1));
        }
    });

    // Spawns a new thread an gives him data (using move so that closure takes ownership
    // of values it uses)
    let v = vec![1, 2, 3];
    let handle2 = thread::spawn(move || {
       println!("Here's a vector: {:?}", v);
    });

    println!("hi from the main thread!");
    thread::sleep(Duration::from_millis(1));

    // Waits spawn threads
	handle1.join().unwrap();
	handle2.join().unwrap();
}
Message passing to transfer data between threads
Message passing between threads is done with Channels. Channels are like a river, in which a transmitter can put something into it, and a receiver can get it somewhere down.
use std::sync::mpsc;	// Multiple Producers, Single Consumer
use std::thread;

fn main() {
    let (tx, rx) = mpsc::channel();

    // as the mpsc channel is for multiple producers, we can clone tx into tx1 to
    // be used in another thread:
    // let tx1 = mpsc::Sender::clone(&tx);

    thread::spawn(move || {
        let val = String::from("hi");
        tx.send(val).unwrap();
        // The send() function takes ownership of its parameter, and then gives it to the
        // receiver. After tx.send(val), we couldn't use val in a println for instance.
    });

    // recv() method is blocking. Use try_recv() for non-blocking method
    let received = rx.recv().unwrap();
    println!("Got: {}", received);

    // if tx was sending multiple messages, we could print them using rx as an iterator
    for received in rx {	// recv() is implicitly called
        println!("Got: {}", received);
    }
}
When a variable is passed to another thread through a channel, the ownership is transfered and the first thread should no longer use this variable. With message passing, there is never a shared ownership.
Shared-State Concurrency
In shared-state concurrency, multiple threads can access the same memory location at the same time.
The Mutex<T> API
Shared-State concurrency can be handled using Mutex, which principle is to lock it when accessing a shared variable, and unlock it when we’re done with the variable.
use std::sync::{Arc, Mutex};
use std::thread;

fn main() {
    // Arc (Atomic Reference Counted value) allows to clone the Mutex, and therefore
    // having multiple ownerships on it.
    let counter = Arc::new(Mutex::new(0));
    let mut handles = vec![];

    for _ in 0..10 {
        let counter = Arc::clone(&counter);
        let handle = thread::spawn(move || {
            // lock() blocks the thread until we can access the variable
            let mut num = counter.lock().unwrap();

            *num += 1;
        });

        // Mutex's lock is automatically released after it goes out of scope

        handles.push(handle);
    }

    for handle in handles {
        handle.join().unwrap();
    }

    println!("Result: {}", *counter.lock().unwrap());
}
OO Programming Features
Classes & Objects
Rust provides struct to make objects containing data and behavior. The encapsulation is done with the private fields of a struct.
pub struct AveragedCollection {
    list: Vec<i32>,
    average: f64,
}

impl AveragedCollection {
    pub fn add(&mut self, value: i32) {
        self.list.push(value);
        self.update_average();
    }

    pub fn remove(&mut self) -> Option<i32> {
        let result = self.list.pop();
        match result {
            Some(value) => {
                self.update_average();
                Some(value)
            }
            None => None,
        }
    }

    pub fn average(&self) -> f64 {
        self.average
    }

    fn update_average(&mut self) {	// private method
        let total: i32 = self.list.iter().sum();
        self.average = total as f64 / self.list.len() as f64;
    }
}
Inheritance & Polymorphism
Rust doesn’t implements classes inheritance, because it is often at risk of sharing more code than necessary. Instead, the Traits with default methods allow to do the thing.
To perform polymorphism in rust, Traits and Generics are used. Below is an example of a GUI library displaying on the screen objects implementing the Draw trait :
pub trait Draw {
    fn draw(&self);
}

pub struct Screen {
    // can store different types of components, like buttons, textfields, rounds, etc..
    pub components: Vec<Box<dyn Draw>>,
}
impl Screen {
    pub fn run(&self) {
        for component in self.components.iter() {
            component.draw();
        }
    }
}

pub struct Button {
    pub width: u32;
    pub height: u32;
    pub label: String;
}
impl Draw for Button {
    fn draw(&self) {
        // Code to draw the button
    }
}

fn main() {
    let screen = Screen {
        components: vec![
            Box::new(Button {
                width: 50,
                height: 20,
                label: String::from("Hello"),
            }),
            // etc...
        ],
    };
    screen.run();
}
Patterns and Matching
All places where patterns can be used
/* ------------------ match arms ------------------------------------- */
match VALUE {
    PATTERN => EXPRESSION,
    PATTERN => EXPRESSION,
}

/* ------------------ Conditional if let expression ------------------ */
let favorite_color: Option<&str> = None;
let is_tuesday = false;
let age: Result<u8, _> = "34".parse();

if let Some(color) = favorite_color {
    println!("Using favorite color {}", color);
} else if is_tuesday {
    println!("Tuesday is green day!");
} else if let Ok(age) = age {
    if age > 30 {
        println!("Using purple");
    } else {
        println!("Using orange");
    }
} else {
    println!("Using blue")
}

/* ------------------ while let conditional loops -------------------- */
let mut stack = Vec::new();
stack.push(1);
stack.push(2);
while let Some(top) = stack.pop() {
    println!("{}", top);
}

/* ------------------ let statements --------------------------------- */
// let PATTERN = EXPRESSION;
let (x, y, z) = (1, 2, 3);

/* ------------------ Function Parameters ---------------------------- */
fn print_coordinates(&(x, y): &(i32, i32)) {
    println!("Location: ({}, {})", x, y)
}
Refutability: Whether a Pattern might fail to match
Patterns can be refutable, in which case they can fail to match, or irrefutable in which case they can’t.
// Refutable pattern
if let Some(x) = a_value { ... }

// Irrefutable pattern
let x = 5;

// Errors
let Some(x) = a_value;	// Won't compile! If a_value is None pattern would fail
if let x = 5 { ... }	// Compilator warning that it doesn't make sense
Advanced Features
Macros
Why are macro useful:
- DRY: need of similar functionalities in multiple places but with different types
- Domain specific languages: allow to define special syntax for special purpose
- Variadic interfaces: define an interface that takes a variable number of arguments (e.g.
println!)
// example of macros into a module
#[macro_use]	// pulls out the module's macros in the main.rs
mod macros {
    macro_rules! say_hello {
        () => {
            println!("Hello world!");
        };
        ($var:expr) => {
            println!("Hello {}!", $var);
        };
    }
    macro_rules! find_min {
        // base case
        ($x:expr) => ($x);
        // $x followed by at least one $y
        ($x:expr, $($y:expr),+) => (
            // call find_min! on the tail $y
        	std::cmp::min($x, find_min!($($y),+))
        )
    }
}

fn main() {
    say_hello!() 			// Hello world!
    say_hello!("there")		// Hello there
    find_min!(1,5,2)		// 1
}
Some of the variables designators:
blockexpris used for expressionsidentis used for variable/function namesitemliteralis used for literal constantspat(pattern)pathstmt(statement)tt(token tree)ty(type)vis(visibility qualifier)